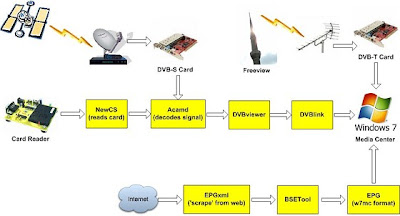
1. Component List
The following components will be required to setup
- Motherboard with onboard COM port. Ensure it has enough PCI and PCIe slots to accommodate for all your hardware. There are plenty around with onboard HDMI. Using the onboard frees up a PCIe slot.
- Case to suit motherboard
- Phoenix card reader (I have found the Jaycar kit to be the most practical for reasons I will give later in this tutorial)
- RAM. More is always better. (4 gig for 32 bit, more for 64 bit)
- Core 2 Duo CPU. Quad core is nice, but reports are that NewCS does not work with them (Argo note: unless you use Linux O/S).
- Hard Drive. Must be big enough to handle all the recording you wish to do, in addition to the operating system, other software and any other recorded media you might have (music, photos, etc.).
- Network hardware – If you want to stream media over a home network, then I suggest a hardwire LAN. Most motherboards have built in LAN ports. Otherwise, built in wireless will be fine for downloading software and EPG updates.
- DVB-T tuner(s). I use a Terratec Cinergy 2400DT dual PCIe tuner. This is why I prefer the onboard HDMI. I use my only PCIe slot for the FTA tuner.
- DVB-S tuner(s). FTA tuners will work nicely. Tuners with built in CI slots are not necessary, but will work. The only reason I say this is because the CI will not be used in this set up, and are usually more expensive than the FTA tuners.
- Analog tuner. I only use it to pick up FM radio.
- Remote control. Must be MCE compatible.
- Satellite Dish. If you have an existing Foxtel / Sky Service, then the satellite dish installed will save you a lot of work as it is already aimed to the correct satellite. If you want to use multiple DVB-S tuners, you’ll need to change out the LNB, depending on the one already fitted. Most standard Foxtel installs include a single LNB for the basic service. I have a dual Sony LNB purchased from eBay for $27AU (Including postage). If you do need to swap out the LNB, you will need to buy/rent/borrow a satellite finder and orientate the dish & LNB to the correct satellite. For those in the Brisbane area, I have one that can be “borrowed” for the weekend for the cost of a six-pack. This is negotiable.
- FTA Antenna and connections. I have a common antenna point in the house connected to a 1 to 4 splitter. The connections are 1. DVB-T card, 2. TV, 3. Analogue card and 4. FM tuner on the analogue card.
- Cabling should be Quad Shielded
- Separate connections for each DVB-S card
2. Software
Required Software:-
- Windows 7 Ultimate (only because I have no experience with home basic)
- All necessary drivers
- Codec pack (Argo note: H264
- DVBlink TVSource
- NewCS (Argo note: NewCS V1.2 for Windows non-dual core CPU , upto V1.65 for Windows & dual-core, any higher version requires Linux O/S)
- Acamd
- Free EPG XMLTV Downloader
- CSA.dll
3. Setting Up
I always prefer to begin with a clean install as my system is a dedicated HTPC. Start with no cards installed, except for the video card if you’re using one.
1. Install W7
2. Install Drivers
3. Run Windows Update – Make sure you have all the updates you need. You may want to run it a few times to make sure you have everything
4. Install Codecs
5. Shut Down PC
6. Install Phoenix Card Reader and Tuner cards and drivers
7. Turn off UAC – This is required to setup TVSource
8. Make a directory in C:/newcs
9. Copy the following files into the directory:-
mingwm10.dll
Newcs.exe
Newcs.xml
NewcsGUI.exe
pthreadGCE2.dll
10. Make a shortcut in the startup folder to the NewcsGUI.exe. - This is so it starts up when the computer does.
11. Insert your Foxtel smartcard into the card reader and start the NewcsGUI.exe. – You need to confirm the provider ID for your TV service. Write it down. E.g., Foxtel satellite is 090B.
12. Install DVBlink TV Source
Step 1: Install DVBlink Server (restart computer)
Step 2: Install DVBLink TVSource
Step 3: Start DVBLink Source Configuration
Step 4: If you just want one tuner skip step 5 through 7
Step 5: Remove TVSource by selecting it in the middle and pressing the red <- arrow left of it
Step 6: Add a TVSource by selecting TVSource on the left and pressing the green -> and give the name you want
Step 7: Repeat step 5 for more tuners
Step 8: Place csa.dll and plugins into C:\Program Files\DVBLogic\DVBlink\Sources\\Plugins – Each tuner needs an individual name. Newcs and acamd will need to be modified to reflect this. For this purpose, the plugins you put in are cardclient.conf and acamd.dll
At this point, we pause and undertake points 12 and 13
Step 9: Repeat step 7 for every other TVSource tuner found in C:\Program Files\DVBlogic\Sources\
Step 10: Continue setup as per the manual.
13. Edit newcs.xml so it looks something like this:-
Phoenix on COM1
phoenix
357
COM1
odd
normal
no
yes
no
no
no
yes
0000000000 -->
0000000000 -->
no
no
no
34000
yes
fifo
no
0000
No
10001
localhost
20
-1
8080
no
newcs
normal, init
console,tcp
normal,init
1001
normal,init
yes
newcs
01 02 03 04 05 06 07 08 09 10 11 12 13 14
tuner1
password1
localhost
34000
1
on
off
no
14. Edit cardclient.conf so it looks like this:-
newcamd:localhost:34000:0/090b/ffff:tuner1:password1:0102030405060708091011121314
15. At this point, you may want to setup XMLTV Download. Have it output the xml file into the XMLTV folder in TV Source. Run it up and have it bring down the epg data.
16. Go back and resume the TV Source setup as per the manual.
Author: tbergman


